Wednesday, 25 November 2015

Happy thanksgiving!

Happy Thanksgiving to all my American mamas! Hope your having a great day :) 
I am very thankful for all that I have right now - although it my not be a lot materially, I have the sweetest, funniest, grumpiest Zebra I could ever ask!

Enough with the sentiments, and onto the crafts! 
Let's start with food, because we love playing with our food here! On the menu for lunch is a turkey sandwich with apple and cucumber feathers. This turkey is thankful for his pots of cheese, raisins and crackers.
The Zebra is thankful I remembered to take the googley eyes off before she started eating!
We had three different craft activities this afternoon, a wreath, a turkey and corn. 
The wreath was a very quick and easy make. The only preparation needed was to cut the middle out of the paper plate.
Spread glue all around the plate wreath
After you've finished tickling and playing with the feathers, stick them onto the plate.
It's also fun to throw the feathers up and let them land, before squishing them into the glue.
Once it's all dry, the wreath can be popped up on the wall! 

The Zebra did her painting for the turkey and corn all at the same time, and then mummy finished them off once she was in bed and it had all dried.
To get the corn and feather effect, I used yellow, orange and brown paint layered on the paper. Use Pritt-stick to glue bubble wrap onto a rolling pin, then paint on a colour.
I used brown first as it's the darkest colour and made a good base for both projects.
After that was the red 
Followed by the yellow. The Zebra had great fun applying the colour, it was a very quick and easy way to get the whole pieces of paper covered. The texture of bubbles and paint on the pin was also great for her to play and explore 
After we had several piece of printed paper, it was time for free play with the paints! 
Once the prints had all dried it was time for mummy to do her thing! 
To make the corn, cut one print into a sausage shape. Using some green paper, cut out the shape of the leaves. Stick it all together and your done!
For the turkey, cut out a template for the wing - it should be about 1/3 of a piece of A4 paper.
Cut out 8 feathers, trying to get the most coloured parts of the prints.
Using brown paper, cut out a peanut shape, with the top half slightly smaller.
Arrange the feathers around the body and glue on. Using scraps from the prints, cut out two legs and a beak. Pop on some googley eyes and use a feather for the snood!
Happy Thanksgiving Everyone!

Monday, 23 November 2015

Pine Cone Trees

This was more a craft for mummy but the Zebra got to have a fun painting session! 

This year I want to try and make as many of our Christmas decorations as we can - they feel more special and means I don't have to spend loads of money on junk.

I found some lovely pines, and after cooking them for about 40 minutes, they smelt and looked lovely.
Cooking the cones help kill any bugs and also makes them open up. This is a before and after from one of the cones:
After leaving them to cool overnight I mixed up some green paint and threw some glitter in.
Now the fun bit! We had a good play with the cones, it's the first time the Zebra has ever held a pine cone and she had exploring the textures.
We grabbed a couple of brushes and set to work painting the cones green.
After the Zebra had gone to bed and the cones had dried, it was time for mummy to transform them into trees. I glued a strip of ribbon to a toilet roll tube and then glued the cones on top.
It really is that simple! They can be left like this or full decorated. I have popped some red butterflies on top and am really happy with the finished product 

Saturday, 21 November 2015

Banana choc-chip loaf


It's Saturday again, which can mean only one thing - baking!! 
I found a great recipe from Mary Berry on the Good Food website (Banana Choc Chip LoafIt had all normal ingredients and can all be made in one big bowl, perfect for the Zebra to get stuck into.

You will need:
- 3 bananas 
- 2 tbsp milk
- 100g soft butter
- 150g plain flour
- 150g caster sugar 
- 1 tsp bicarb of soda
- 1 tsp baking powder 
- 2 eggs 
- 100g chocolate chips 
****pre-heat oven to 160****
First up, we had to mash the banana in a bowl. I knew this would end up with a fair bit of tasting, so I used more banana than the recipe asked for! 
Next, put all the dry ingredients (except the choc chips) into a big bowl
Give it all a good stir
Then add in the wet ingredients.
And again, a good stir! Hands or spoon work equally well...
Last to add in are the chocolate chips. Not sure if there's a baking reason behind this, but I know if they were in from the start the Zebra would have eaten them all before the mixture was stirred
And that's the cake mix made! A really easy recipe. Another tip I use - have every ingredient measured and in separate bowls on the counter before you start. That way there's no waiting around for the Zebra, and everything is to hand for me. Makes the whole experience more fun for this age. As she gets older, we can introduce the weighing aspect.
Line a tin with some grease-proof paper and spoon in the mixture
At this point I realised I have a very big tin and not much cake!
While the Zebra licked the spoon and bowl, I quickly whipped up a second batch and added to our tin - this is why my ingredients list is different to the recipe on the website
The recipe said to cook for 40-45 minutes but I found it needed 55 minutes due to the size.
Poor Zebra had quite a wait for it to cook as we are used to making cupcakes
But good things come to those who wait and I'm rather pleased with the end result for our first cake together.
The Zebra certainly approves!

Friday, 20 November 2015

Rainbow spaghetti

I've seen about a million cute pictures of babies playing with rainbow spaghetti so I thought it best to give it a go before the Zebra gets too old.

It's really easy to make!

*Boil a big pan of spaghetti until cooked.
*Rinse under cold water and pop into a big plastic bowl.
*Mix together 4 tablespoons of hot water with 1 tablespoon of olive oil and half a table spoon of Wilton food gel. 
*Pour the colour over the pasta and mix up really well.
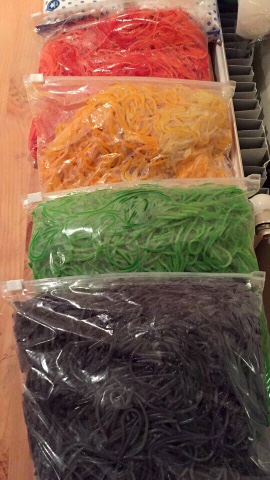
*Stick it all in a Ziplock bag
 
Obviously, this needs to be repeated for each colour you want! Leave the bags overnight to let the colour really soak in.
Give each colour pasta a quick rinse in cold water before playing with, it makes it more playable! 
It's a weird texture and takes a bit of getting used too! 
But it does feel really good on feet!
And it's totally edible too :)
It takes quite a while to prep - I feel the Zebra is too old now to fully enjoy the sensory experience so it's not one we will do again. But it's a good one to remember in case our herd ever grows!