Showing posts with label crafts. Show all posts

Tuesday, 22 March 2016

Easter Egg Chicks


Cheep cheep!! It's nearly Easter and we all know it's more fun to find a chick in your egg than chocolate... 


It's not like me to buy pre-made crafts, but I found such fun stuff in The Range I just couldn't help myself! 
However, what I thought was a big bag of yellow feathers turned out to be a feather boa... Because what is Easter without dressing up like a sexy bird?!


Cover the foam chicks in PVA glue...


...then go crazy with the feathers - Make sure you wash any glue from your hands first! 


Once they are totally covered in feathers, put them to one side.


Once the chicks have dried, add some googely eyes and a triangle of orange paper for the beak.


Cut a zig-zag across the egg so the chick can hide inside.


Aren't they just the cutest?! 


And there are so many different designs you could try - the egg can also be decorated! 


Thursday, 10 March 2016

St. Patrick's Day


Happy St Patrick's Day! 
Here's hoping you find a pot of gold at the end of your rainbow...


As well as the yummy rainbow fruit breakfast and the emerald green snacks, we have made some lovely crafts! 


We used an arrary of paints - as you would expect when painting a rainbows! For the shamrocks we used green paint, and also a mosaic of green textures (we always keep junk mail and use it for cutting out bits for crafting).


Use each colour of the rainbow to paint a handprint on white paper. Let them dry, then cut them out. 


Cut out a rainbow shape from white card and then glue down the handprints. Isn't this just the cutest rainbow ever!


For the first shamrock, we used some old corks and dabbed them in green paint - the Zebra had so much fun stamping!


We then covered a sheet in glue and stuck down all the cut out green pieces to make a big collage.


Once they had both dried, I used a heart shake cookie cutter to make a shape of a shamrock to cut around. 


💚May the luck of the Irish be with you💚 

Thursday, 3 March 2016

Daffodils


Spring is almost here! The weather is getting nicer, and 20th March was the official start on the calendar...


We made these pictures for mothers day, however they are a great general Spring craft, or even for Easter cards.


This Zebra just loves her hand being painted!!


Stamp four yellow hands to create the outer petals...


...and an orange hand in the middle for the flowers head. Mummy then added a line of green for the stem.


It's not just daffodils, this method could be used to create all sorts of colourful flowers!

Tuesday, 9 February 2016

Valentine's Day Cards


Love is in the air!! I may be single, but that doesn't stop us spreading a little love (and glitter)!!


Missing from this picture is the heart shaped cookie-cutter to make the glitter shapes! If you don't have one, just cut a heart shape from cardboard to use as a stencil.


We started with our hand and footprints! The Zebra just loves getting her toes painted.


On one piece of card, stamp a foot in the middle of the page - this is for the love bug. 


Using black pen or paint, colour in the heel of the foot to make a head, draw on some feelers and legs, and then decorate the body. If you have googely eyes you can also use them! 


For the word art, have two pieces of paper horizontally. On one do the handprint on the right hand side, on the other use two feet to make a 'V' on the left hand side.


Use glue to mark out a L and a E. Cover in as much glitter as you can! Stick the two pieces together to make Love x
 

Using the heart cutter or stencil, glue around the outside several times on the piece of card.


Time to bring the glitter out again!


These would all make a great cards for valentines, or even just to have as a pictures! 

Here's hoping you have a lovely day, what ever your plans xx


Monday, 18 January 2016

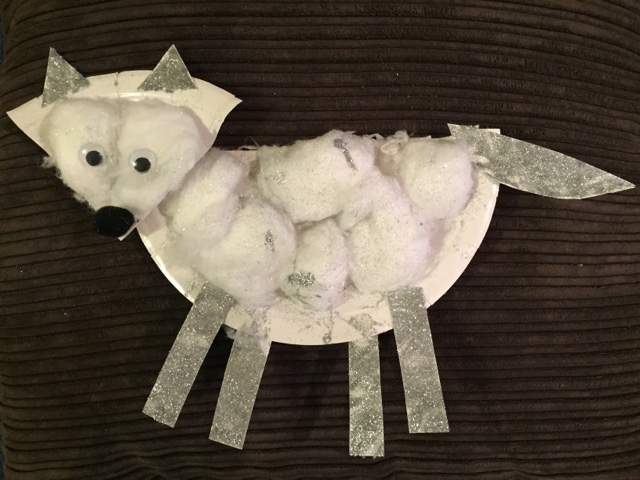
Arctic Fox

Brrrr!! It's some cold out there still!! We haven't been lucky enough to have snow down here in Cornwall, but that didn't stop us making a snowy fox...

Cotton wool and paper plates are the main materials, but, as always, we like to throw in some glitter and googley eyes! 

As this is a relatively clean craft, the Zebra was more than happy to wear her apron(!) She loves to 'dip-dip' and was content covering a whole plate in cotton wool.

The Zebra got a by confused with the glitter glue today and tried splatting her hand on to make handprints - however she just scraped the glue off and ended up with very silver glittery hands!!

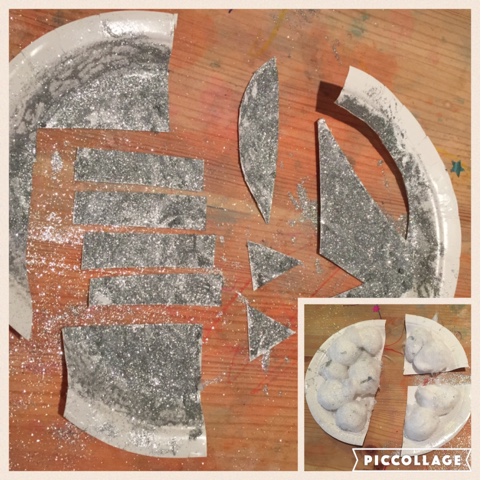
Once dry, you need to cut the plates into the fox. The cotton wool needs to be cut into half to make the body, and then a quarter for the head.
From the glitter, cut 4 rectangles for legs, 2 triangles for ears, and a sausage shape for the tail.

Glue the parts together and add the eyes and nose and there you have it! One super sweet and sparkly Arctic Fox.

Monday, 4 January 2016

Spaghetti Day

Thanks to some random googling last night, I found out today is National Spaghetti Day. I'm not sure which nation this is for, but it seemed a good theme for the Zebra to enjoy!

I had two activities in mind, using just a few basic supplies I'm sure most people would have! I used orange card, but plain paper would work just as well.

To prepare the lion, I drew the basics of a lion face on the card, then, using a sponge brush I made a mane with pva glue. The spaghetti I snapped in half to use as hair.

I showed the Zebra how to stick a piece of spaghetti down, and she had a go but clearly doesn't have the fine motor skills yet. I snapped up the spaghetti until it was all very little bits in the jug, and then let her pour it over the picture! To make them stick, she would pat them down onto the picture. 
To fill in the gaps between pasta, we used gold glitter which worked a treat!

I stuck on some googley eyes to complete the fun spaghetti lion!

To keep her busy while I tidyed up and started tea, I gave her some whole spaghetti sticks and the collinder. She loved fitting them through the holes and it will help improve those fine motor skills!


Thursday, 31 December 2015

New Years Eve sparkle

New Years Eve is not a holiday that can really be properly celebrated with a toddler! However, we have ended our crafty year with lots of glitter to make fireworks 
Just basic supplies needed for this craft. The more variety of glitters the better.
Using a paint brush, I let the Zebra paint the glue onto the paper 
After that, just let loose with the "shake-shake" 
If you use the glue to write straight onto the paper, you can also make some funky pictures 
This glitter can be added all over to give a shiny look (just remember to leave it flat when drying!!!!)
 Or the glitter can go on in stripes or blocks!
Whatever you decide - you will still be finding glitter all round the house long into summer...